Power Transmission / Belt Drives
Why Your V-Belt Keeps Slipping After You Tension It
- Doc
- v-belt-slipping-after-tensioning
- Section
- power-transmission/belt-drives
- Revised
If you tightened the V-belt and it was slipping again shortly after, what you need isn't more tension. A slip that tightening fixes would have been fixed on the first adjustment. The fact that it came back is itself the signal that the cause lives somewhere other than tension. A V-belt doesn't make its grip from tension alone — it works because the belt's side walls wedge against the groove side walls. Once that wedging action is gone, no amount of tension brings the grip back; it only eats belt, sheave, and bearing life. Narrow it down with three questions: does the tension hold, where does the belt sit in the groove, and when does it slip.
Key Specifications
| Specification | Value | Source |
|---|---|---|
| Belt top flush with, or slightly above, the top of the groove | Normal seating. Groove wear isn't your slip cause — look at tension, contamination, and capacity instead. | MRO Magazine, Checking pulley grooves in a V-belt drive |
| Belt sits below the top of the groove, groove bottom polished shiny | Groove wear has killed the side wall wedging action (bottoming). Retensioning won't fix it; the sheave needs replacing. | MRO Magazine, Checking pulley grooves in a V-belt drive |
| Side wall wear beyond roughly 1/32 inch (0.8 mm) by groove gauge | Sheave replacement threshold. Fitting only a new belt destroys the new belt quickly. | MRO Magazine, Checking pulley grooves in a V-belt drive |
| Target deflection | 1/64 of span length (about 50/64 inch for a 50-inch span). Apply force perpendicular at the span midpoint. | TB Wood's, Installation & Maintenance of V-Belt Drives |
| Deflection force reference | Apply the run-in value (higher force) and the post-run-in normal value separately. Retension new belts after 24 to 48 hours of running. | TB Wood's, Installation & Maintenance of V-Belt Drives |
| Definition of correct tension | The lowest tension at which the belts run without slipping under full load. Anything above only raises shaft and bearing load. | Gates, Belt Drive Preventive Maintenance and Safety Manual |
| Belt running hot with cracks starting at the bottom | Slip heat or a hot environment. Until the slip cause is fixed, a replacement belt repeats the failure. | Gates, Belt Drive Preventive Maintenance and Safety Manual |
| Replacement unit on a multi-belt drive | Replace the whole set, never a single strand. Mixing new and old concentrates load and brings the slip back. | Gates, Belt Drive Preventive Maintenance and Safety Manual |
Types & Variations
Classical V-belt (A, B, C, D sections)
Traditional section with a low thickness-to-width ratio. Needs more strands and more width for the same transmitted power.
Use: Maintenance replacement on existing equipment. The sheave groove and belt section are a matched pair — forcing a different section into the groove makes it seat wrong and slip.
Narrow (wedge) V-belt (3V, 5V, 8V or SPZ, SPA, SPB, SPC)
Deeper, narrower section, so wedging action and power capacity are higher for the same width.
Use: Upgrading a drive that slips at peak because of insufficient capacity, within the same installed space.
Cogged (raw-edge cogged) belt
Notched underside gives lower bending resistance, so it runs cooler on small sheave diameters and at high speed.
Use: Drives where small sheaves make bending and heat unfavorable. Available in dimensions interchangeable with the equivalent wrapped belt.
Banded (joined) belt
Several strands joined by a top band, eliminating length mismatch between strands, belt turnover, and jumping out.
Use: Drives with shock or pulsating loads where individual strands whip or jump out. It still slips on a sheave with worn grooves.
Maintenance Steps
- Lock out and tag out, then open the guard
Confirm rotating parts have come to a complete stop, apply lockout and tagging, and open the guard. Belt seating and groove condition can only be judged accurately at standstill.Never check tension by touching the belt or sheave while running. The pinch and entanglement hazard is severe.
- Check belt seating height and groove condition
Look at whether the belt top is level with the top of the groove, whether the groove bottom is polished, and whether all strands sit at the same height. Measure side wall wear with a sheave groove gauge.If side wall wear exceeds 1/32 inch, replace the sheave along with the belt rather than the belt alone.
- Inspect for contamination and check belt side walls
Check the grooves and belt side walls for oil, coolant, and dust. Glassy polished side walls mean accumulated slip has already occurred.Don't paper over it with belt dressing. Spraying without stopping the contamination source only fouls the grooves further.
- Verify sheave alignment and adjustment hardware
Check both sheaves for axial offset and angular misalignment with a straightedge or laser aligner. Also check motor base bolts, jackscrews, and taper bushings for looseness and movement.Replacing the sheave without correcting alignment wears the new sheave grooves out at the same rate.
- Retension by force deflection
Use 1/64 of the span length as target deflection, apply force perpendicular at the midpoint, and compare against the manufacturer's deflection force range. Set new belts to the run-in value.Don't tension past the top of the range. Excess tension leads to shaft and bearing damage.
- Re-inspect within 24 to 48 hours of running
On a new installation, readjust into the normal deflection force range once run-in is complete, and check belt seating height, heat, and witness line movement at the same time.Skip this re-inspection and the run-in tension drop shows up as "it slips even after tensioning."
Check first: does the tension you set actually hold?
If it grabs right after adjustment and is loose again a few hours later, there are two branches.
First, run-in on a new belt. A new belt seats into the grooves during initial running and tension drops noticeably. That's why manufacturer deflection-force tables give a run-in value (higher force) separate from the normal value used after run-in. On a new installation, retensioning once after 24 to 48 hours of running is part of the standard procedure — and skipping that step is commonly mistaken for "it slips even after tensioning."
Second, the belt is finished. If run-in was long ago and tension keeps bleeding off over days while your center-distance takeup is nearly exhausted, the belt has permanently stretched. Replace the whole set — swapping one strand in a multi-belt drive gives you mismatched lengths, so the new belt carries the load, the rest ride along, and it slips again.
The dividing line is simple: within the first 48 hours of a new installation, call it run-in; recurring after that, look at belt replacement.
One more thing to check is the adjustment hardware rather than the belt. If the motor base bolts, jackscrews, or taper bushings move, the belt is fine but center distance shrinks and tension bleeds off. Scribe a witness line across the base and slot before you adjust, and the next inspection tells you immediately whether the belt stretched or the base slipped.
Where the belt sits in the groove — the number one cause of slip that tensioning can't fix
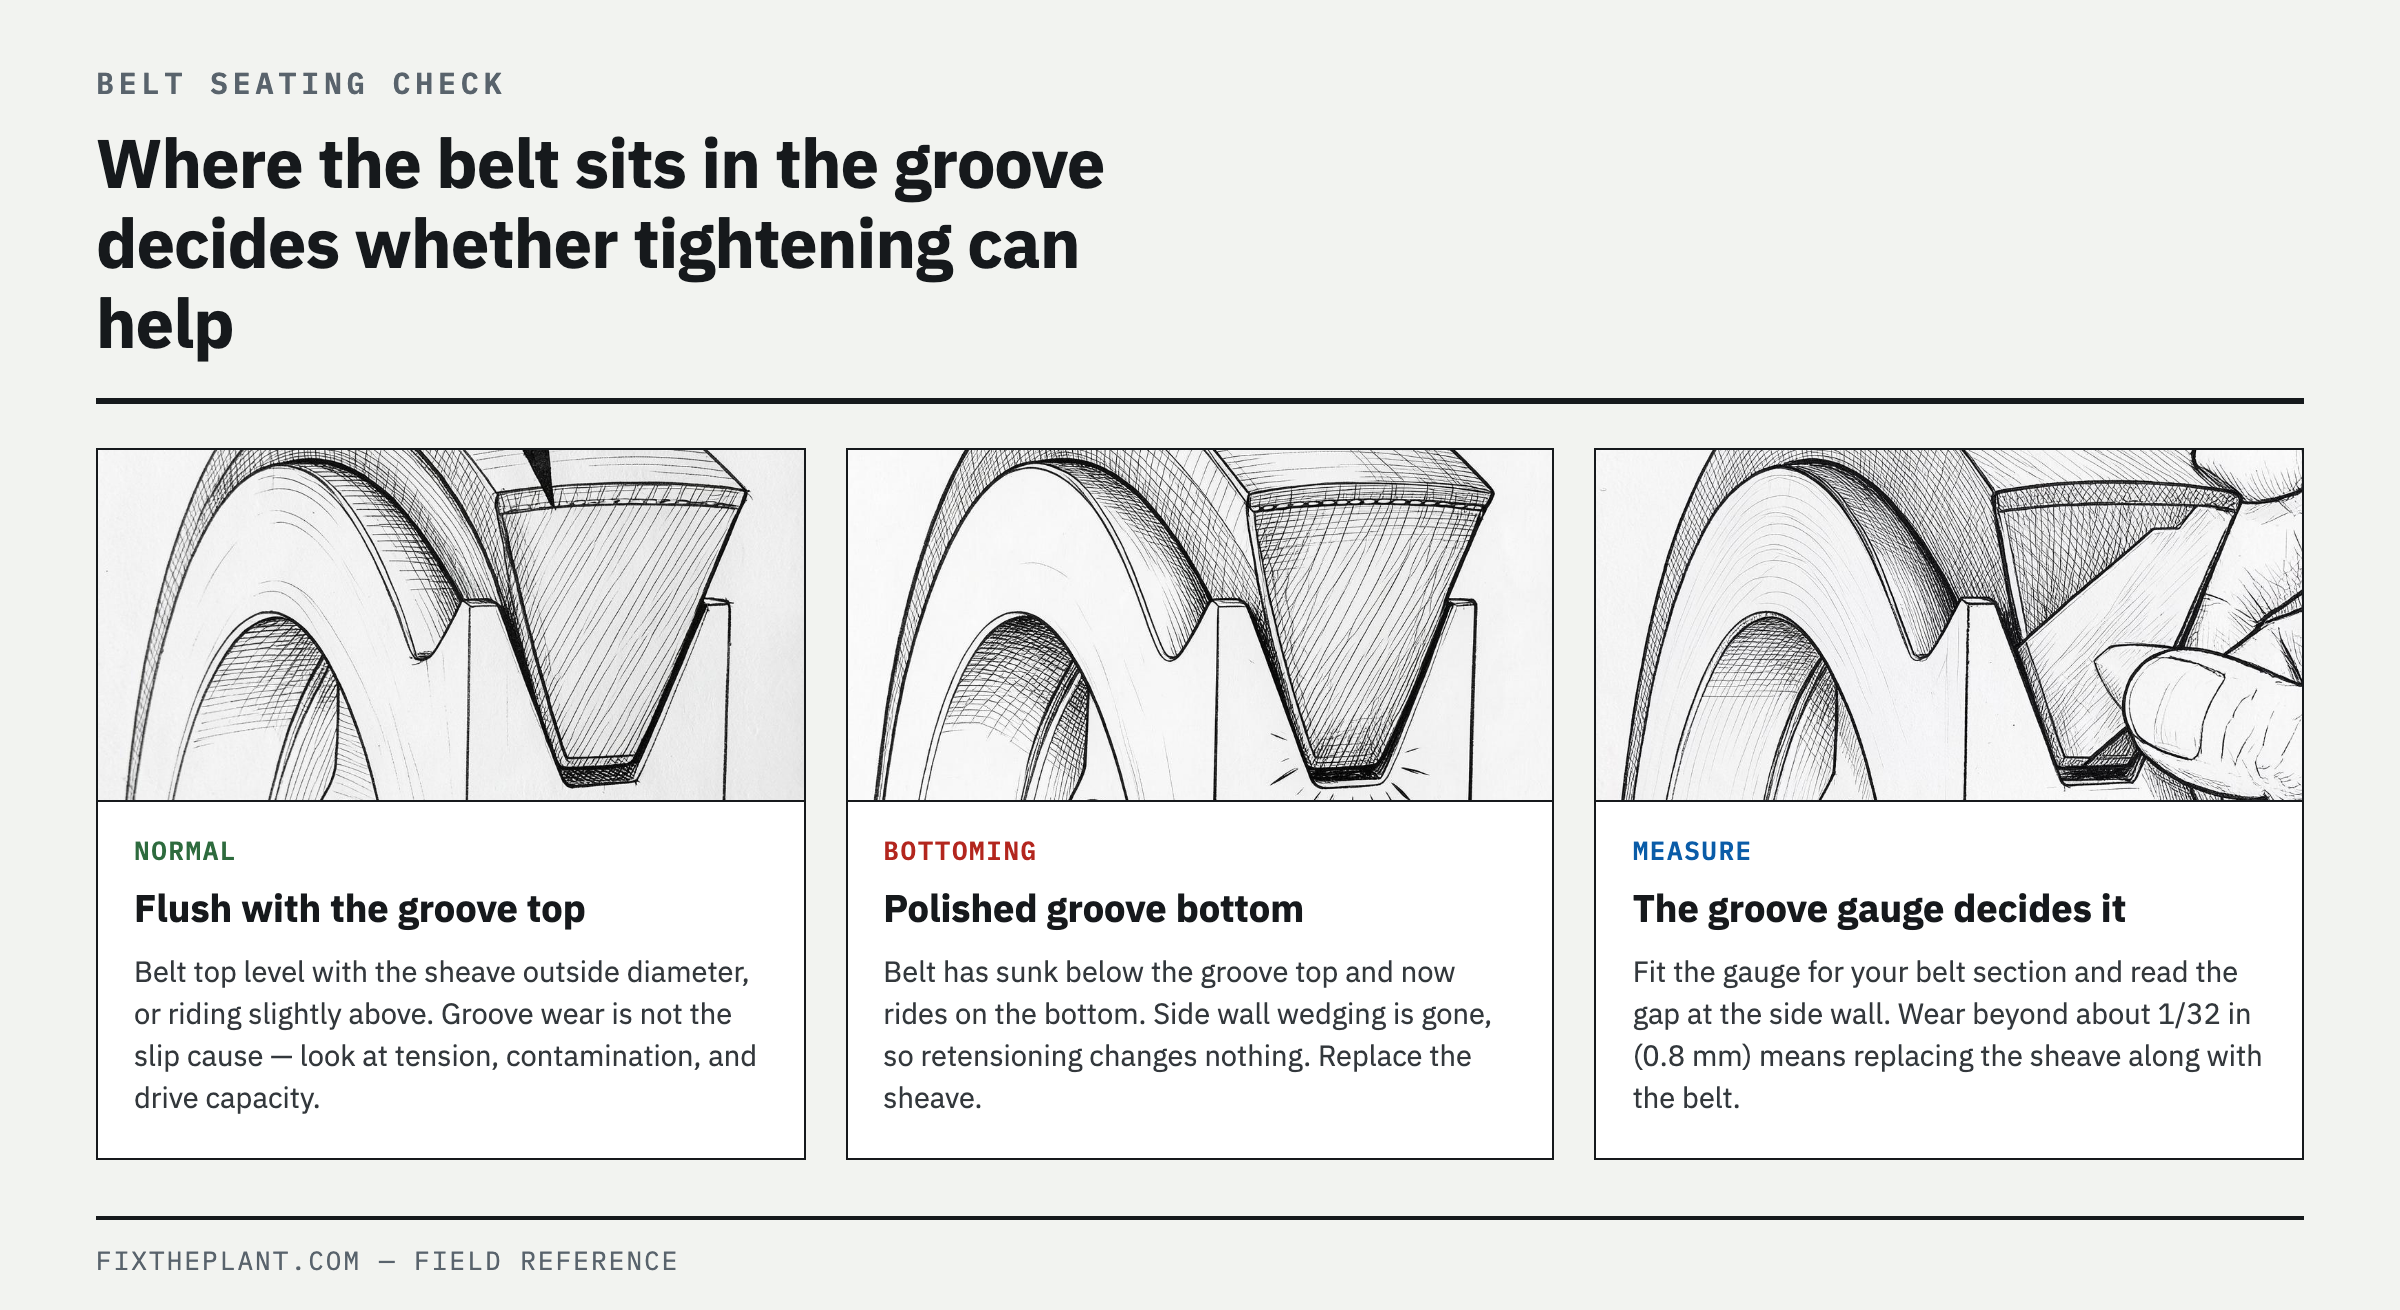
With the drive stopped and locked out, open the guard and look at how high the belt rides in the sheave groove. This single observation decides whether tightening can fix your problem at all.
Normal is the top of the belt flush with the top of the groove (the sheave outside diameter) or riding slightly above it. If the belt sits clearly below the top of the groove, the groove side walls have worn and widened, and the belt drops in by that much. Taken further, the bottom of the belt touches the groove bottom — bottoming. The moment it bottoms, the side wall wedging action that was carrying the load is gone, so raising tension leaves the slip exactly where it was.
Several confirming signs are visible to the eye. A shiny, polished groove bottom means the belt is riding on the bottom. If some strands sit lower than others, the grooves have worn by different amounts, and the low-riding strands carry less load while the rest are overloaded. If you tensioned it correctly and still have some tight strands and some slack ones, read that as rounded grooves.
For a quantitative call, use a sheave groove gauge. Fit the gauge for your belt section (A/B/3V/5V and so on) into the groove and look at the gap against the side wall — side wall wear beyond roughly 1/32 inch (0.8 mm) means the sheave needs replacing. Putting a new belt into that sheave destroys the new belt quickly, so replace the sheave and the belt together.
When it slips — timing splits the causes
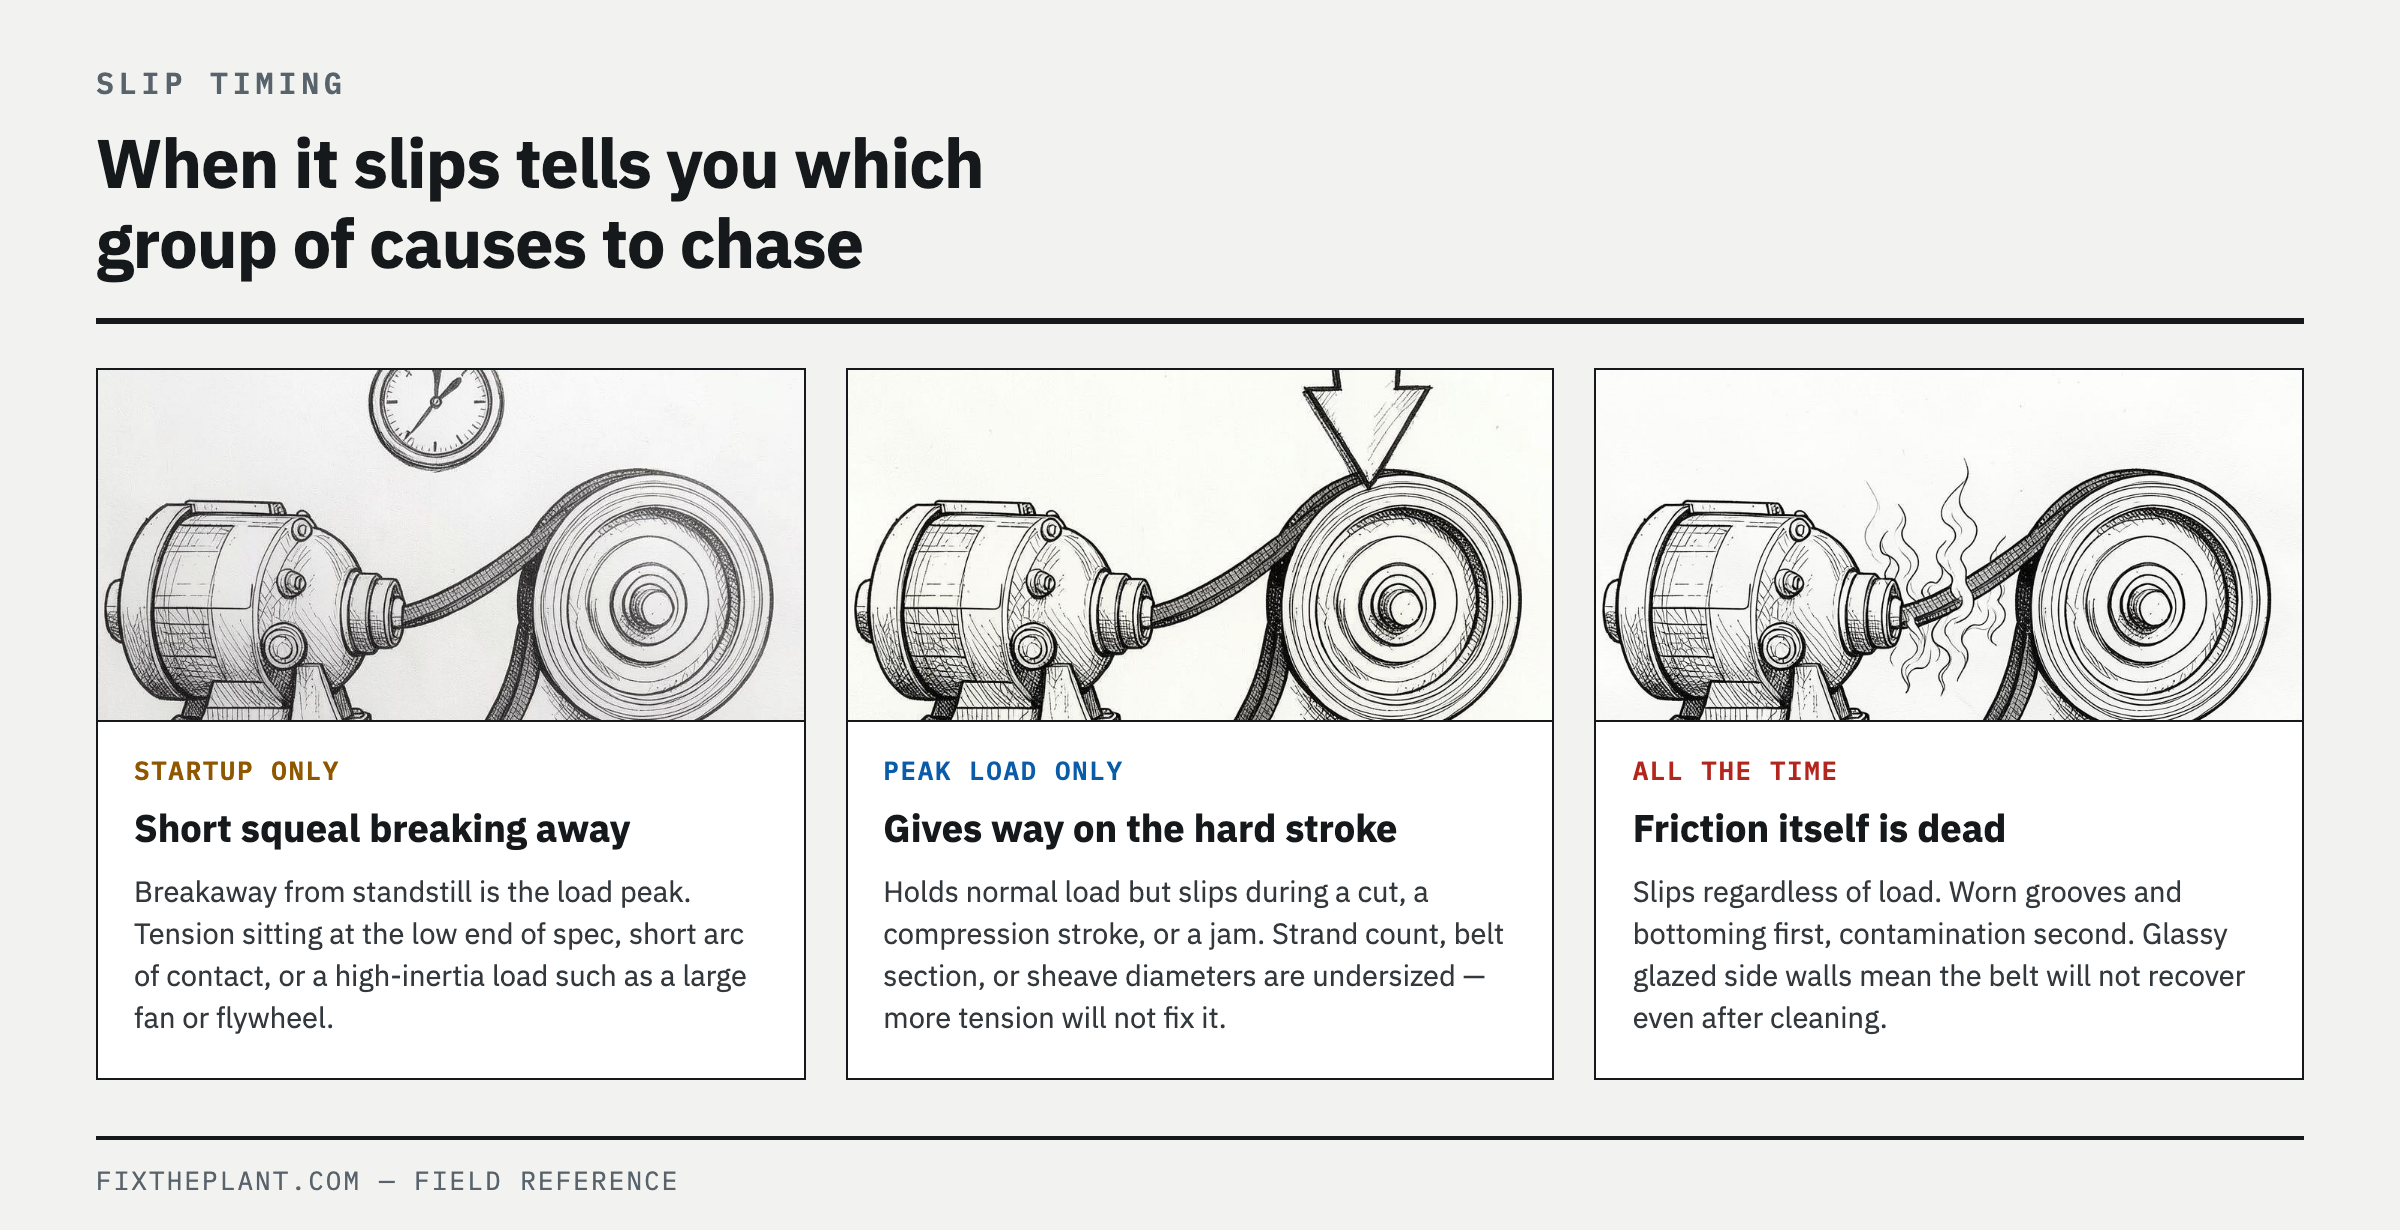
Pinning down the moment the slip happens cuts the candidate list sharply. Judge it by when the squeal occurs.
Slips briefly at startup only: breaking away from standstill inertia is the load peak. It means tension is sitting at the low end of spec, the arc of contact is short (small sheave diameter, short center distance), or the drive is small relative to a high-inertia load such as a large fan or flywheel. If it comes back after retensioning, look at arc of contact and drive capacity.
Slips only as load peaks: if it holds normal load and only gives way during a cut, a compression stroke, or a jam, that points at drive capacity. The number of strands, the belt section, or the sheave diameters don't match the real load — and forcing it to hold with more tension only raises bearing load and shaft bending.
Slips continuously regardless of load: the friction itself is dead. Worn grooves and bottoming from the previous section come first, contamination second. Oil, grease, cutting fluid, or coolant on the grooves or belt side walls collapses the wedging action fast. Glazing — belt side walls polished glassy — is evidence the belt has already been slipping a long time, and a glazed belt won't recover its grip after cleaning, so it's a replacement.
To quantify how much it's slipping, measure actual driver and driven sheave speeds and compare against the theoretical ratio. With no instrument, chalk a line across the belt and sheave while stopped, run it for a set time, and see whether the marks have shifted — that at least tells you slip is occurring.
Cause signatures — from what you observe to what's wrong
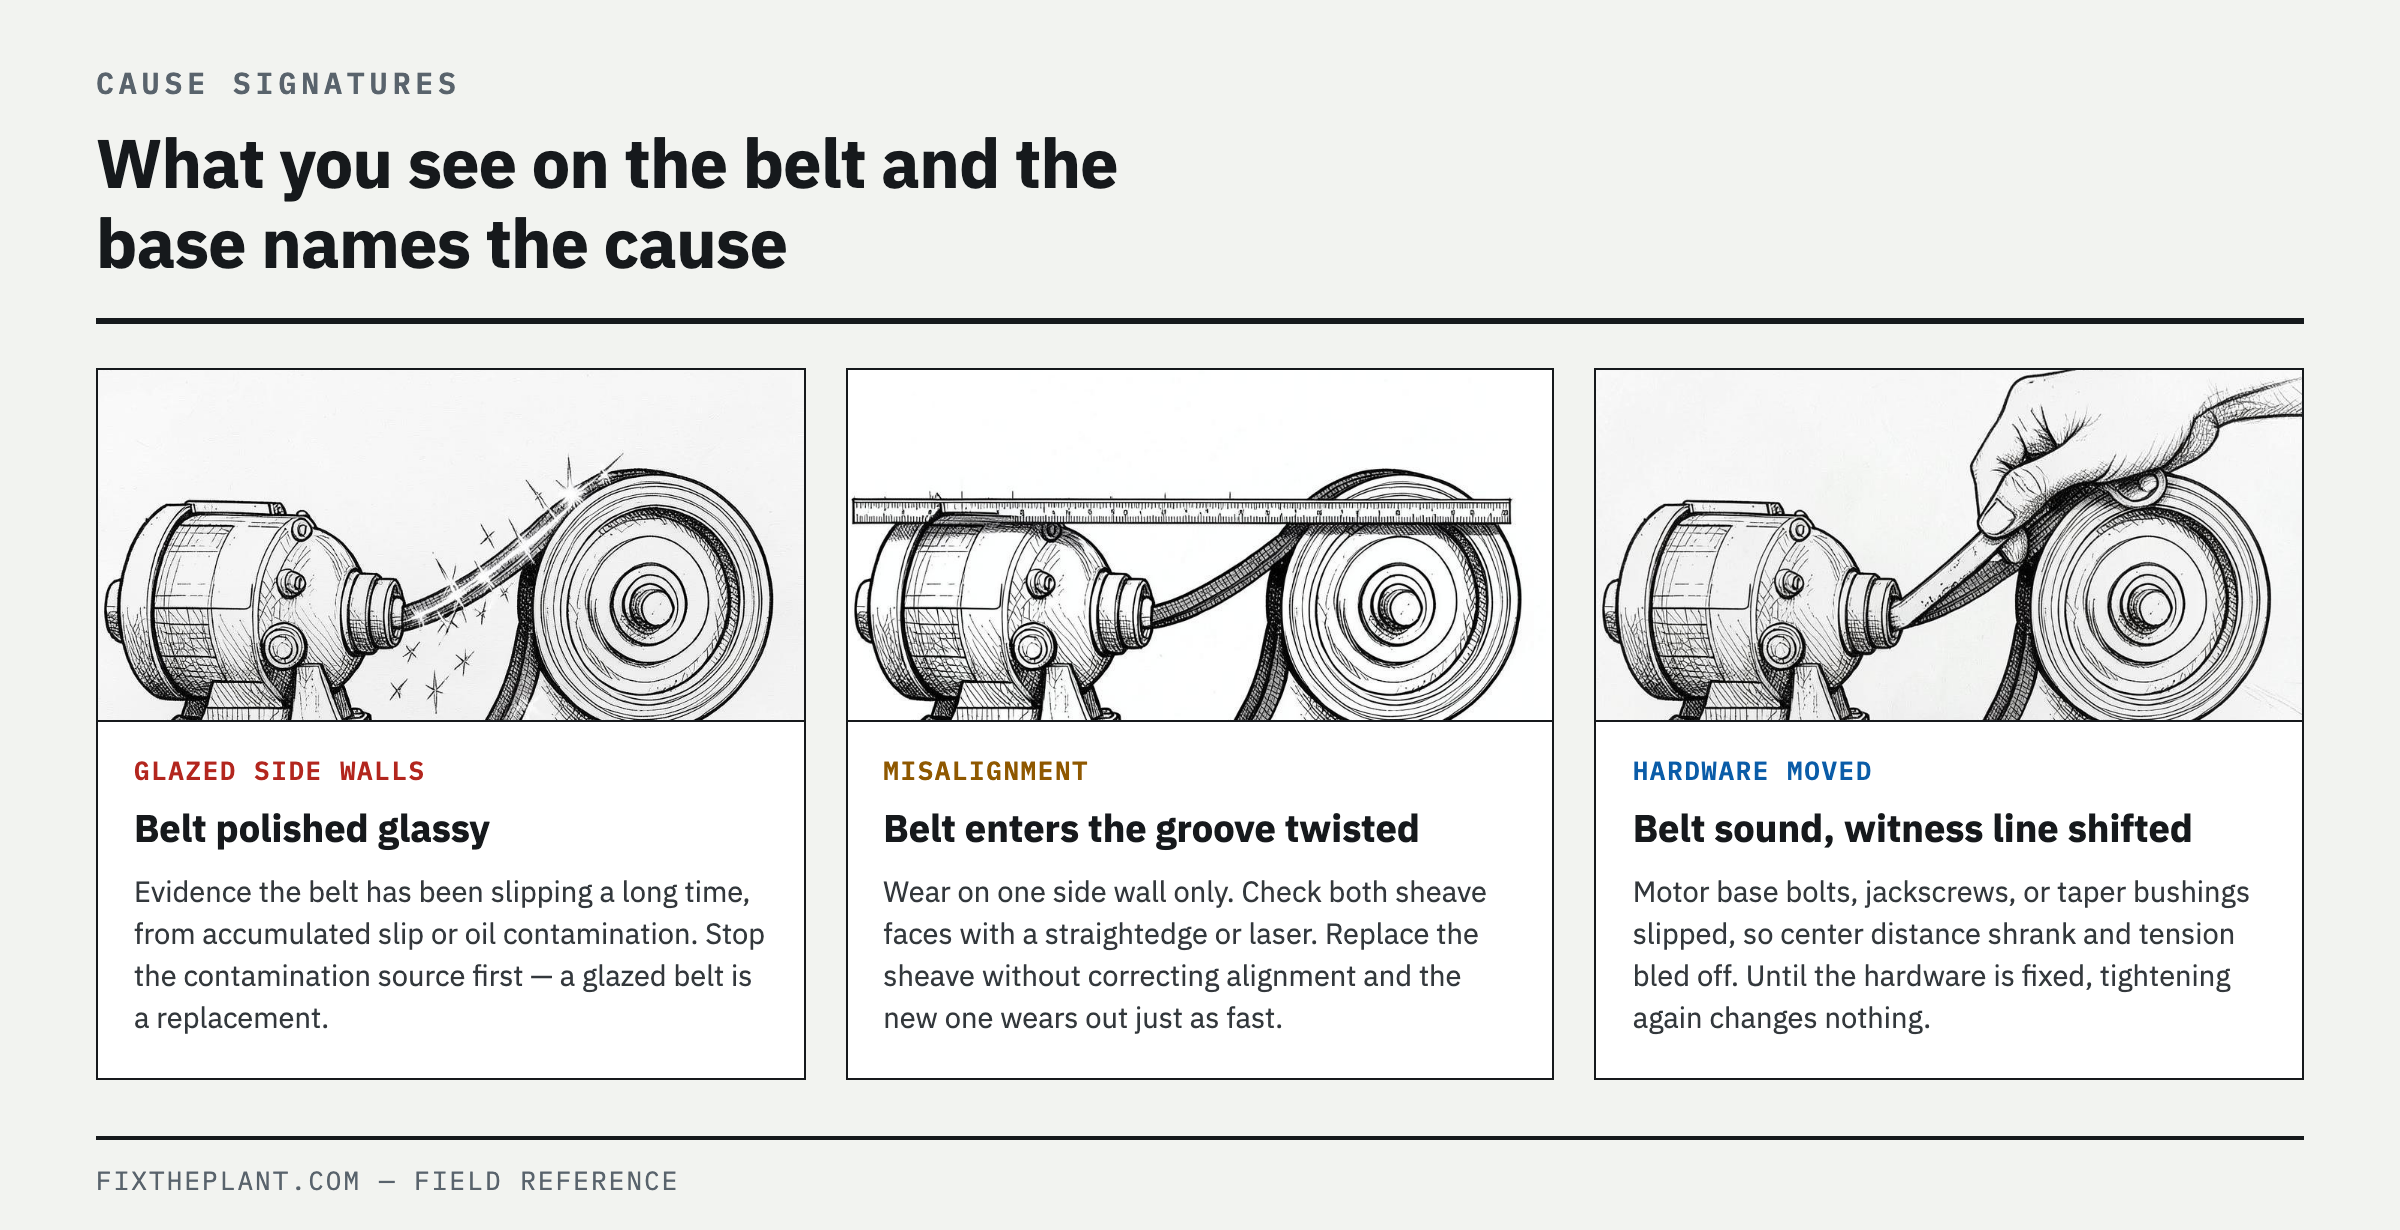
Shiny groove bottom plus belt sitting below the top of the groove: worn sheave grooves and bottoming. Confirm with a groove gauge and replace the sheave.
Strands riding at different heights, some tight and some slack after tensioning: uneven groove wear or mismatched belt lengths. Replace the sheave and the whole belt set together.
Glazed belt side walls plus continuous slip: accumulated slip or oil contamination. Stop the contamination source first, then replace the belt.
Wear on one side wall only, belt entering the groove twisted: sheave misalignment. Without correcting alignment, a new sheave wears out just as fast.
Grabs only right after tensioning and is loose within a day, takeup nearly exhausted: permanent belt stretch. Replace the set.
Grabs only right after tensioning, belt is sound, but the base witness line has shifted: motor base, jackscrew, or bushing movement. Until the hardware is fixed, tightening it again changes nothing.
Gives way only at startup or peak while normal running is fine and components look good: insufficient drive capacity or arc of contact. Revisit the drive selection.
Belt running hot with cracks starting at the bottom and working up: slip heat or a hot environment. Unless you fix the underlying slip, a replacement belt repeats it.
Three things not to do
Don't spray belt dressing. The slip appears to stop for a while, but the root cause — worn grooves, contamination, undersized drive — is untouched, and the compound picks up dust and oil and fouls the grooves further, shortening the life of the next belt.
Don't tension beyond spec. Correct tension is the lowest tension at which the belts will run without slipping under full load. Anything above that goes straight into the belt cords, the shaft, and the bearings as load. Keep cranking because the slip won't stop and you simply move the failure to premature bearing damage.
Don't replace a single strand. Mixing a new belt with stretched old belts in a multi-belt drive concentrates load on the new one, which fails early, and the drive slips again anyway. Always replace by the set, ideally a matched set.
How to measure tension properly — force deflection
Pressing on the belt by hand isn't repeatable, so if you want a judgment you can reproduce, measure by force deflection.
Start by measuring the span length between the two sheaves. Target deflection is 1/64 of the span length (a 50-inch span gives 50/64 inch, about 20 mm). Apply force at the midpoint of the span perpendicular to the belt, read the force needed to reach that deflection with a tension gauge, and compare it against the manufacturer's deflection force range for your belt section, small sheave diameter, and speed.
Distinguish the run-in value from the normal value here. Set a new installation to the run-in value (higher force), then readjust into the normal range after 24 to 48 hours of running. Record the measurement conditions — span, belt section, gauge, reading — on the work sheet, and the next inspection tells you whether tension really dropped or the measurement method simply differed.
FAQ
If it's loose again the day after I tensioned it, is the belt defective?
On a new installation that's usually normal run-in. A new belt seats in during initial running and tension drops, which is why the procedure already includes one more adjustment into the normal deflection force range after 24 to 48 hours. If run-in was long ago and tension keeps bleeding off over days with almost no takeup left, then treat it as permanent stretch and look at replacing the set. If the belt is sound but the motor base witness line has shifted, the hardware slipped instead.
I fitted a new belt and it still slips. Why?
The sheave grooves are already worn. Once the groove side walls wear and widen, even a new belt sinks deep enough that it can't get proper side wall wedging. If the belt top sits below the top of the groove or the groove bottom is shiny, the sheave is a replacement item too. Check whether side wall wear exceeds about 1/32 inch with a groove gauge and you have your answer.
Why shouldn't I use belt dressing?
Because it covers the slip briefly without removing the cause. If the cause is groove wear or insufficient capacity, that stays exactly as it was, and once the compound cakes into the grooves with dust and oil the friction conditions for the next belt get worse. Diagnosing the cause ends up being the faster route.
It squeals only at startup and is quiet afterward. Do I need to fix it?
Startup is the load peak, so a belt tensioned near the low end of spec will slip briefly. Even brief slip glazes the belt side walls and accumulates heat if it repeats, so it's better not to leave it. Retension into the deflection force range first, and if it still comes back, look at whether arc of contact (small sheave diameter, center distance) and drive capacity are adequate for the inertia load.
Is there a way to measure how much it's slipping?
Measure the actual driver and driven sheave speeds and compare against the theoretical ratio for a non-slipping belt to get a slip percentage. With no tachometer or strobe, chalking a line across the belt and sheave at standstill and checking how far the marks have shifted after a set running time will still tell you whether slip is happening.
References
Spotted an error or have a question about this guide? Email contact@fixtheplant.com — corrections are prioritized.