Fasteners / Threaded Fasteners
Why Does a Bolt Keep Coming Loose Even with a Lock Washer?
- Doc
- bolt-loosening-despite-lock-washer
- Section
- fasteners/threaded-fasteners
- Revised
A flattened split lock washer or a shifted witness mark on the bolt head shows the result, but not the cause. Repeated loosening usually means the assembly never developed enough preload, paint, a gasket, burrs, or rough joint surfaces settled and reduced preload, or external forces caused the joint faces to slip and the fastener to rotate loose. A common field mistake is simply tightening the loose bolt harder until the equipment becomes quiet for a while. If the problem recurs at the same location, treat the entire joint as a spring system and evaluate bolt preload, joint stiffness, load direction, and the suitability of the locking method together.
Key Specifications
| Specification | Value | Source |
|---|---|---|
| The witness mark is still aligned, but the joint has developed a gap or leak | Before investigating bolt rotation, check for clamp-load loss caused by paint, gasket, or rough-bearing-surface settlement, member deformation, or thread damage. Do not use breakaway torque alone to determine the initial preload. | NASA Reference Publication 1228, Fastener Design Manual, preload loss and embedment guidance; VDI 2230 Part 1, systematic calculation of highly stressed bolted joints |
| The witness marks on the bolt head and member no longer align | This is evidence that relative rotation occurred. Check whether transverse loading is causing the joint faces to slip and whether fretting at the hole edge aligns with the load direction. | DIN 65151, dynamic testing of the locking behaviour of fasteners under transverse loading (Junker test); NASA Reference Publication 1228, vibration loosening discussion |
| The split lock washer is fully flattened, but loosening keeps recurring | Do not add more washers. Investigate initial preload and transverse slip. After design approval, select another locking method validated for the applicable load, temperature, and reuse conditions. | NASA Reference Publication 1228, Fastener Design Manual, locking washer limitations; DIN 65151, transverse-loading vibration test for fastener locking behaviour |
| The joint is normal immediately after tightening but loosens at the same location after a short run | Suspect initial settlement, differential thermal expansion, local structural deformation, or eccentric loading. Inspect bearing-surface marks and grip length, and measure relative displacement under each operating condition. | VDI 2230 Part 1, loss of preload and load factor in bolted joints; NASA Reference Publication 1228, joint stiffness and preload guidance |
| The joint loosens or leaks despite the use of threadlocker | Compare the product grade, thread size, gap, metal activity, surface contamination, applied quantity, cure time, and service temperature against the product technical data. Rule out commissioning before full cure and oil contamination. | Henkel LOCTITE, Threadlocking User Guide and product Technical Data Sheets |
Types & Variations
Split lock washer
It relies on the spring action and edge resistance of a split ring, but once flattened under high preload it may not reliably prevent significant transverse slip.
Use: Use it only for general-purpose joints where specified by the drawing and manufacturer. Do not stack washers as a universal fix for recurring vibration loosening.
Wedge-lock washer
The geometry of interlocking cam faces resists reverse rotation of the nut or bolt head. Performance depends on contact-surface hardness, hole geometry, temperature, and reuse conditions.
Use: For joints exposed to transverse vibration and requiring maintenance disassembly, verify the manufacturer's application and test data and obtain design approval before use.
Anaerobic threadlocker
It cures between metal threads to resist relative rotation and leakage. Products differ by strength grade, temperature range, gap, and surface requirements.
Use: Apply the specified amount to clean, compatible metal threads when the full cure time can be provided.
Positive mechanical locking
Cotter pins, tab washers, and safety wire physically restrict rotation. They require the correct hole, orientation, and tension.
Use: Apply an approved standard procedure where the consequences of loosening are severe or a visually inspectable positive lock is required.
Maintenance Steps
- Shut down the equipment, apply LOTO, and release residual pressure and stored energy
Identify every electrical, pneumatic, hydraulic, gravitational, spring, thermal, rotational, and interconnected-equipment energy source. After a normal shutdown, isolate, lock, and tag the equipment according to site procedures; relieve pressure at designated bleed points; and mechanically support suspended loads and movable components. Verify a zero-energy state before accessing the joint.A stop button or emergency stop is not energy isolation. Even if a pressure gage reads zero, pressure may remain trapped behind check valves or accumulators. If the bolt supports a structure or piping, disassembly may cause a sudden load shift or fluid release.
- Preserve evidence and inspect the joint before disassembly
Photograph the relative position of the bolt head and member, washer orientation, gaps, fretting, and leakage. Identify the components before disassembly, then compare bolt length, grip, thread engagement, holes, bearing surfaces, threads, washers, and joint deformation against the drawing and manufacturer criteria.Do not loosen bolts one at a time in an arbitrary sequence on a loaded flange or structural joint. Verify that hot components have cooled, and follow the approved support and disassembly sequence to prevent parts from being ejected by residual tension or heavy members from shifting.
- Repair the cause and reassemble under specified conditions
Correct vibration sources, misalignment, deformation, burrs, damaged threads, and compressible clamped surfaces. Use approved new fasteners and locking devices, and establish the specified lubrication or cleanliness condition for the threads and bearing surfaces. Apply the specified torque or preload with a calibrated tool, following the prescribed pattern and stages. Follow the threadlocker technical data for cleaning, application, and curing.Do not apply an existing dry-thread torque value to lubricated threads or stack lock washers. Excess torque can yield the bolt, strip threads, and deform the flange. If no value is specified, do not estimate one; consult the responsible engineer or OEM.
- Restore guards, conduct a controlled test run, and monitor the trend
Remove tools and fully restore guards, supports, and piping. Move personnel outside the hazard zone, then conduct a staged test run under approved conditions. Check for leaks, abnormal vibration, joint movement, and witness-mark displacement from a safe distance. At the specified inspection interval, isolate the equipment again and inspect the joint condition.Do not touch bolts or open guards during operation to inspect marks at close range. If a witness mark moves or you observe leakage, fretting debris, abnormal vibration, or structural movement, apply the shutdown criteria and reevaluate the cause.
Confirm the symptom — distinguish bolt rotation from clamp-load loss first
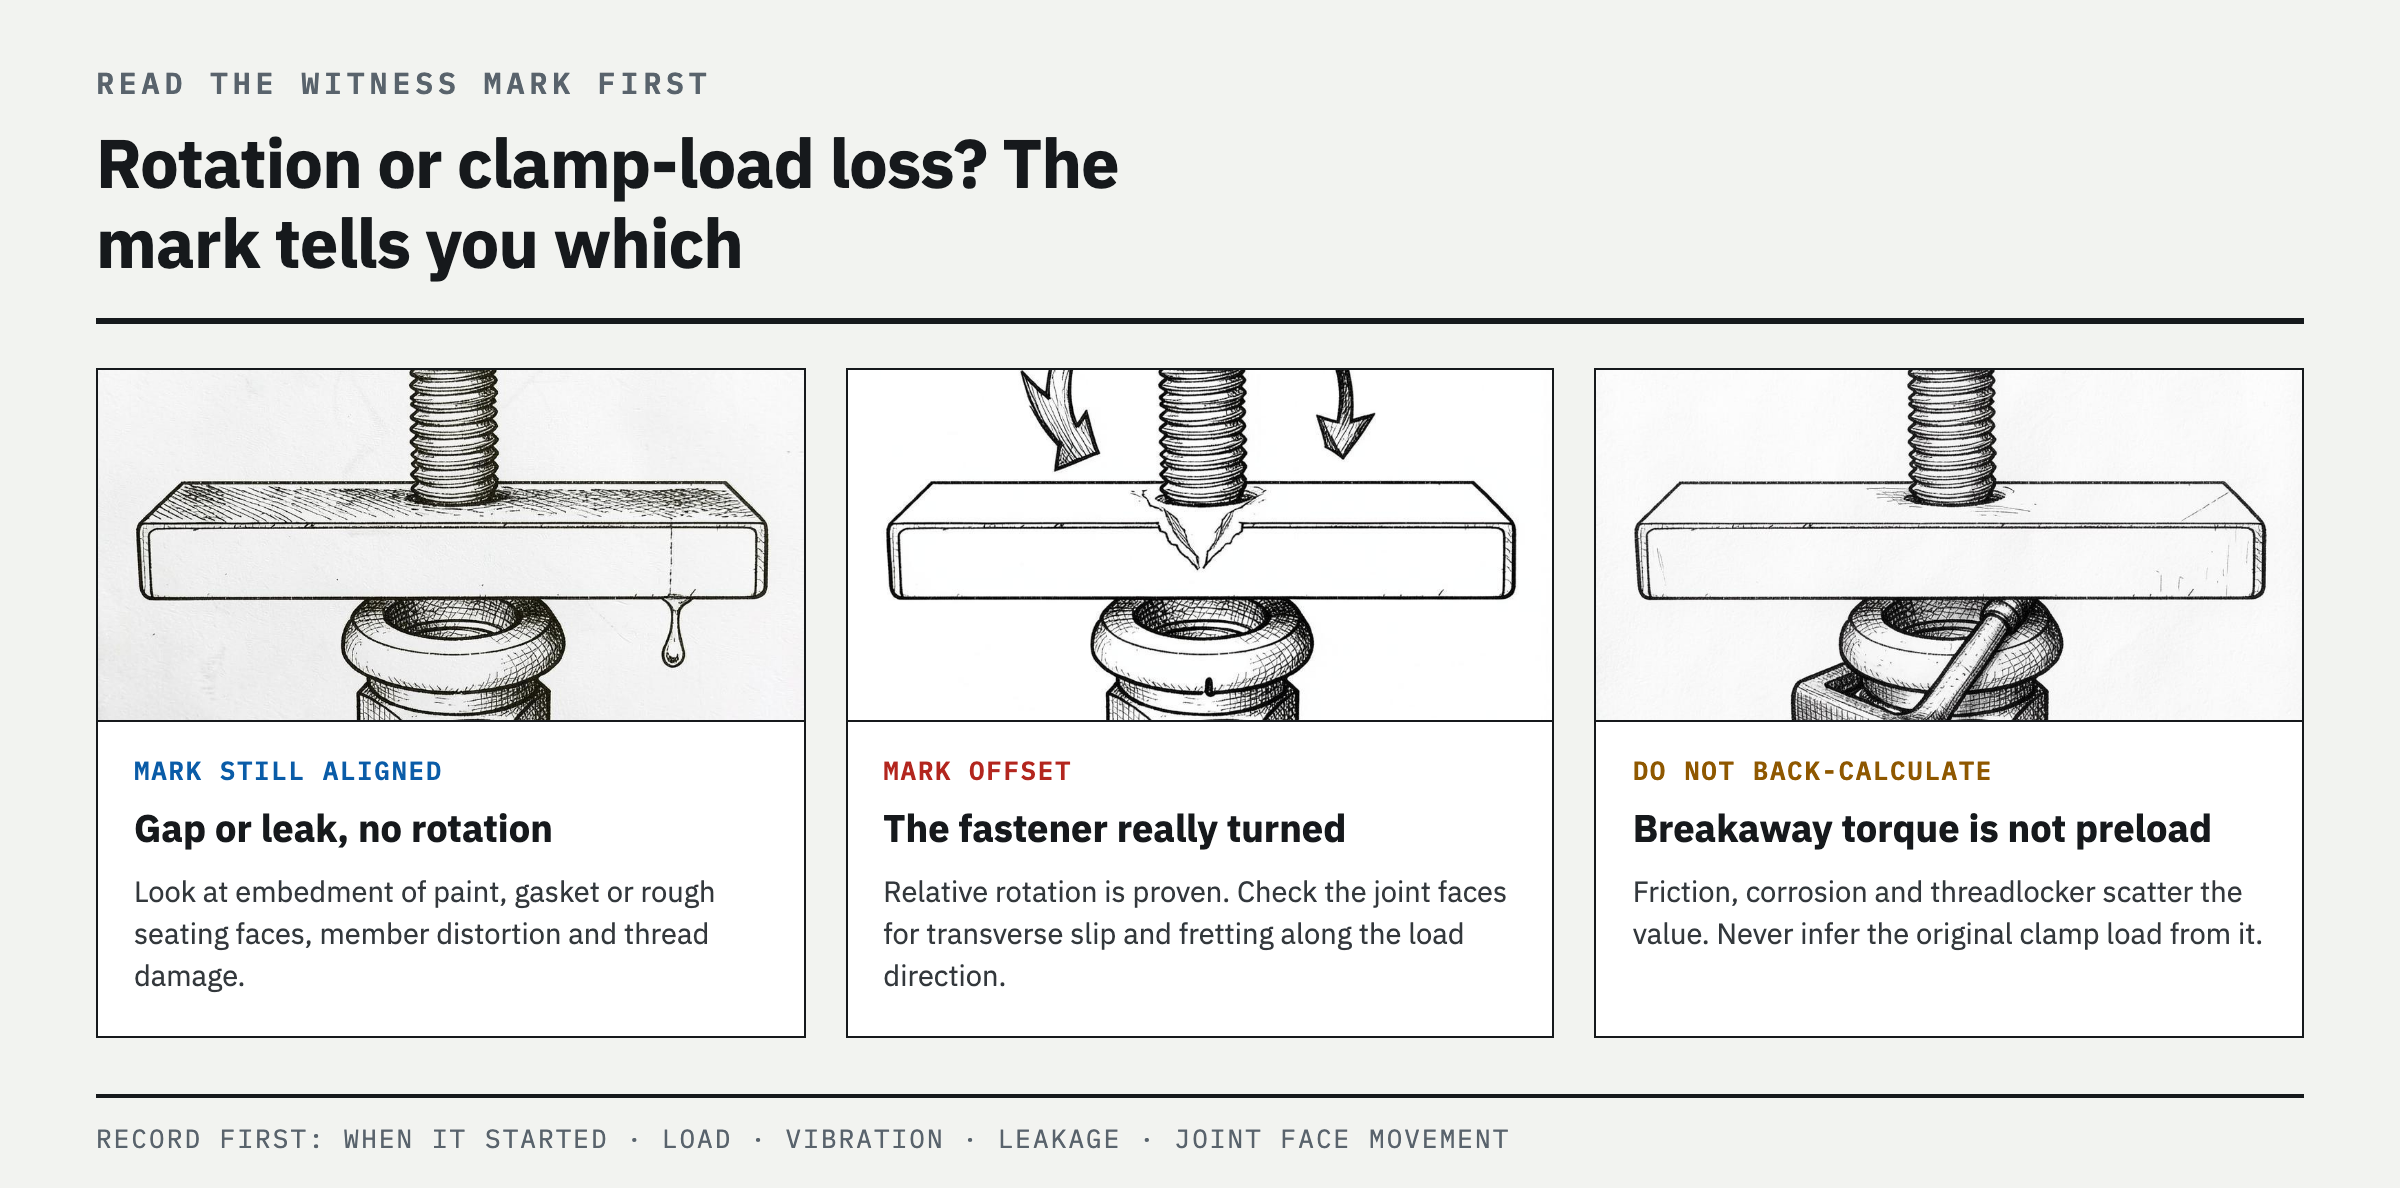
Before shutdown, record when the problem occurs, the load, vibration, leakage, and joint movement from a safe distance. After maintenance, apply a witness mark across the bolt head and stationary member so relative rotation can be checked at the next inspection. If the mark remains aligned but the joint develops a gap, leak, or loose washer, first investigate clamp-load loss from paint or gasket settlement, member deformation, thread damage, or bolt elongation. If the mark has shifted, self-loosening caused by transverse slip is likely. Rust-colored debris, elongated holes, polished contact bands, and fretting are evidence of joint movement. Do not measure breakaway torque with a torque wrench and use it to back-calculate the original clamp load. Friction, corrosion, and threadlocker can substantially change the reading.
Possible causes — narrow them down in the order most often encountered in the field
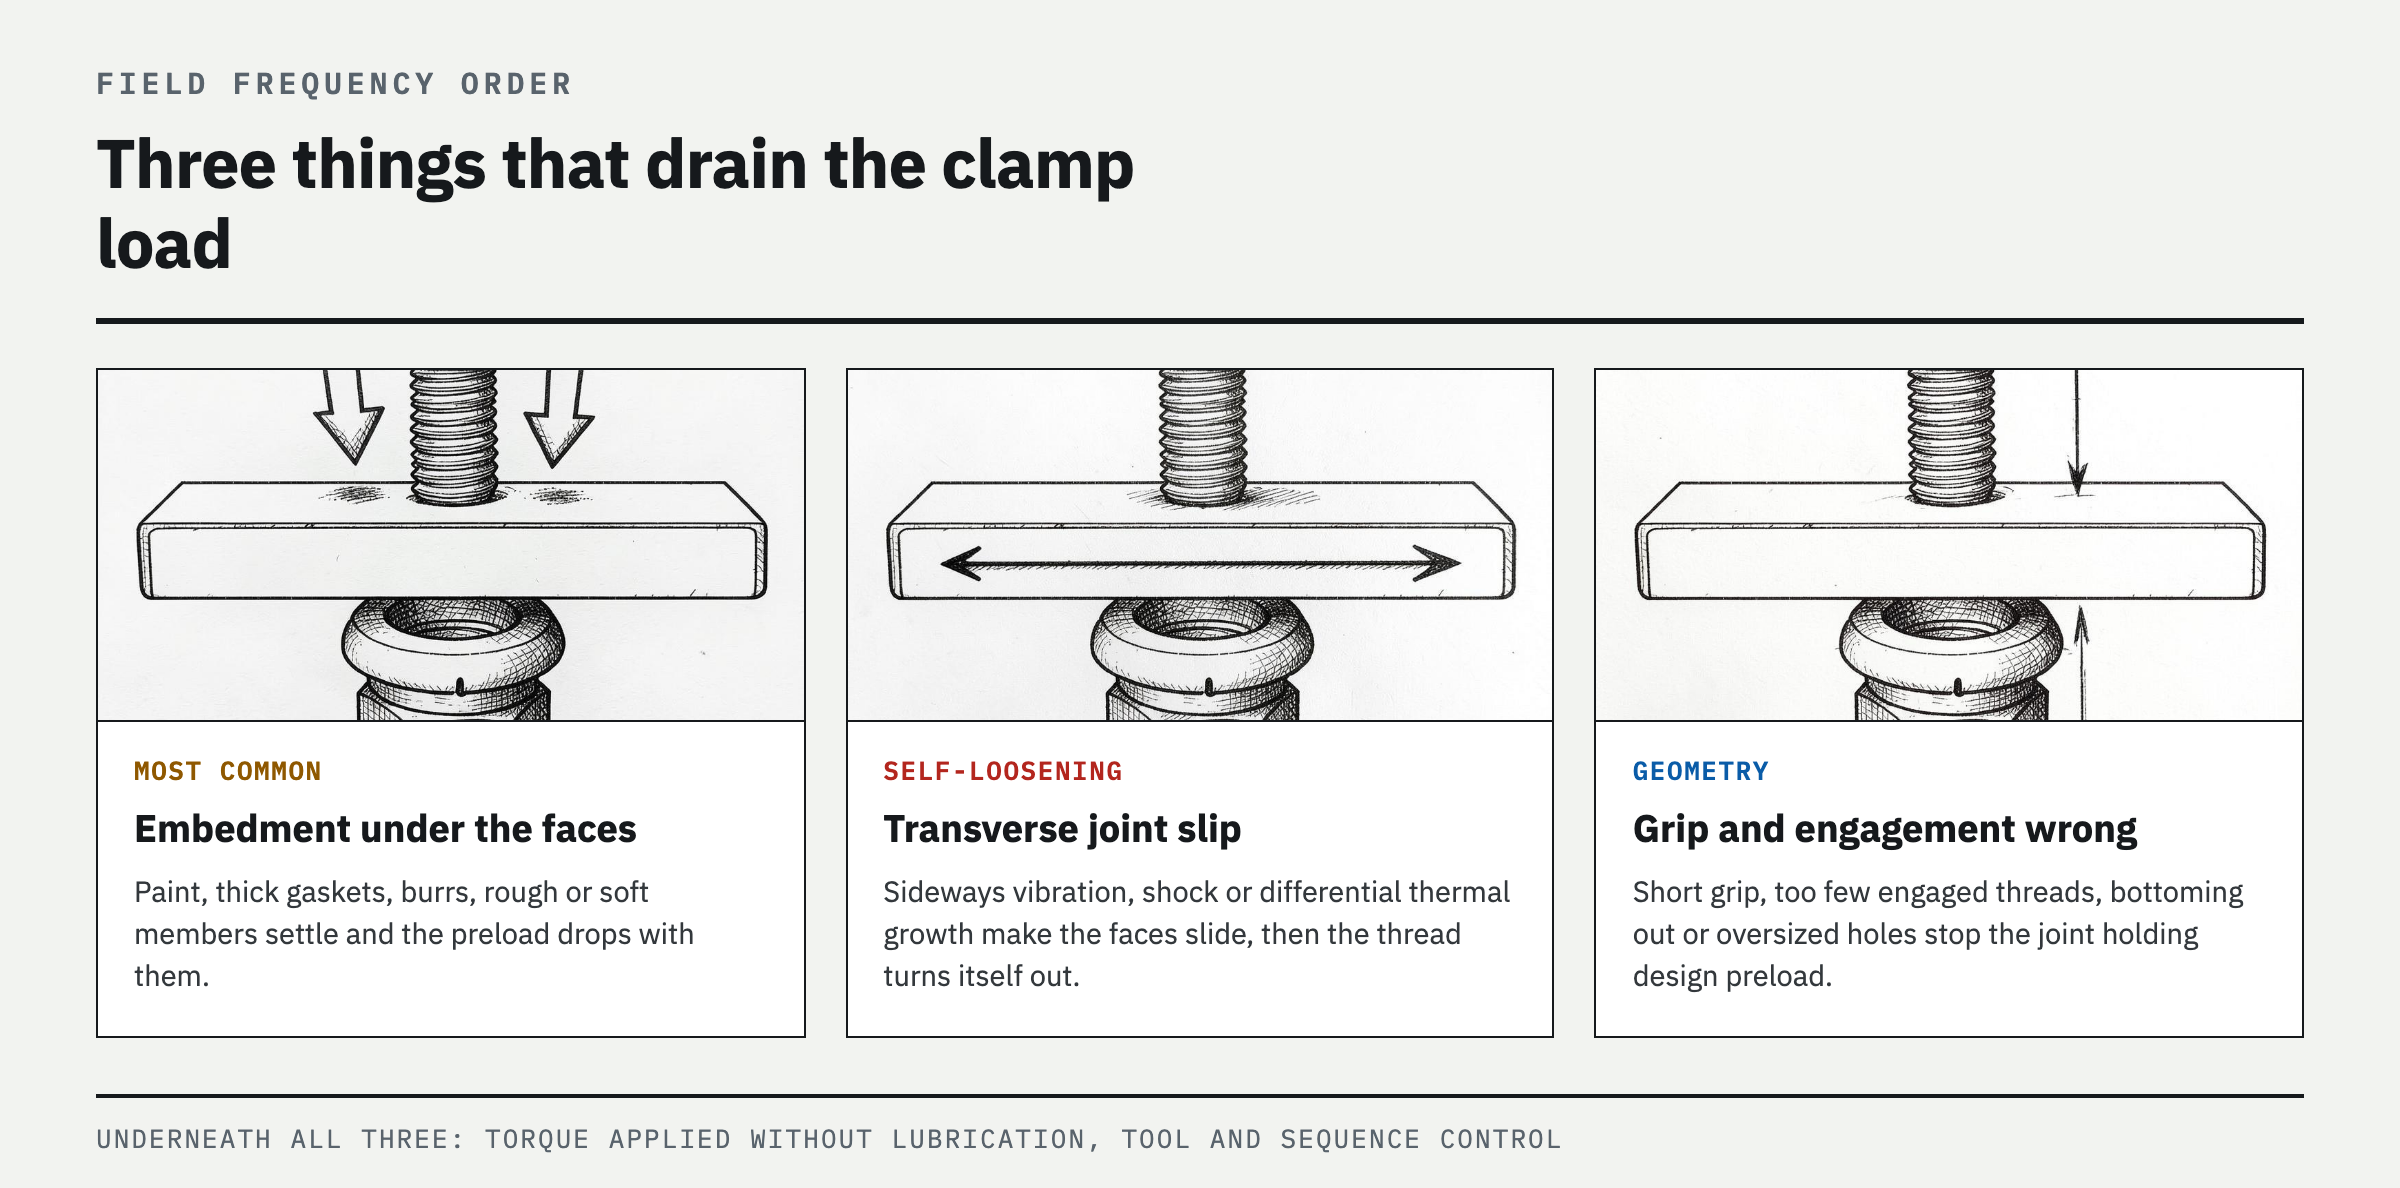
First, initial preload may be too low because the applied torque did not account for lubrication, surface finish, tooling, or tightening sequence. Second, paint, thick gaskets, burrs, rough surfaces, or soft members may settle, or contact areas may plastically deform and reduce clamp load. Third, transverse vibration, impact, or differential thermal expansion may make the joint faces slip. Fourth, the joint may be unable to maintain design preload because of an excessively short grip length, inadequate thread engagement, bottoming, oversized holes, damaged or contaminated threads, or an incorrect bolt grade. Fifth, once a split lock washer is fully flattened, it may not provide enough locking action to prevent transverse slip and may embed in a soft bearing surface, increasing settlement. Sixth, single-use bolts, nuts, or locking components may have been reused; the threadlocker may be unsuitable for the temperature, oil exposure, or gap; or the locking device may be inappropriate for the direction of rotation or installation conditions. This order is a starting point based on general maintenance experience; the equipment failure history and manufacturer analysis take precedence.
Diagnose each cause — build evidence from marks, dimensions, assembly records, and comparison tests
Photograph the installed orientation of the bolt head, nut, washer, and joint faces before disassembly. Circular impressions and missing paint under the bearing surface indicate settlement; polishing and fretting at a hole edge indicate transverse slip; and deformation of the first engaged thread suggests insufficient engagement or overload. Measure whether the bolt bottomed in a blind hole, whether the unthreaded shank interferes with the nut threads, and whether effective thread engagement and grip length match the drawing. Inspect internal and external threads with a thread gage or approved inspection method, and look for elongation, necking, cracks, and corrosion. Compare the bolt size, property class or grade, surface finish, lubricant, washer orientation, tightening sequence, tool calibration status, and specified torque or preload method against the job instructions. On a multi-bolt flange, compare joint gaps and relative-rotation evidence across the entire pattern rather than relying on one residual-torque reading. If failures repeat in a location aligned with the load direction, also measure structural stiffness, eccentricity, and the vibration source.
Corrective procedure — restore the fastening conditions, then select the right locking method
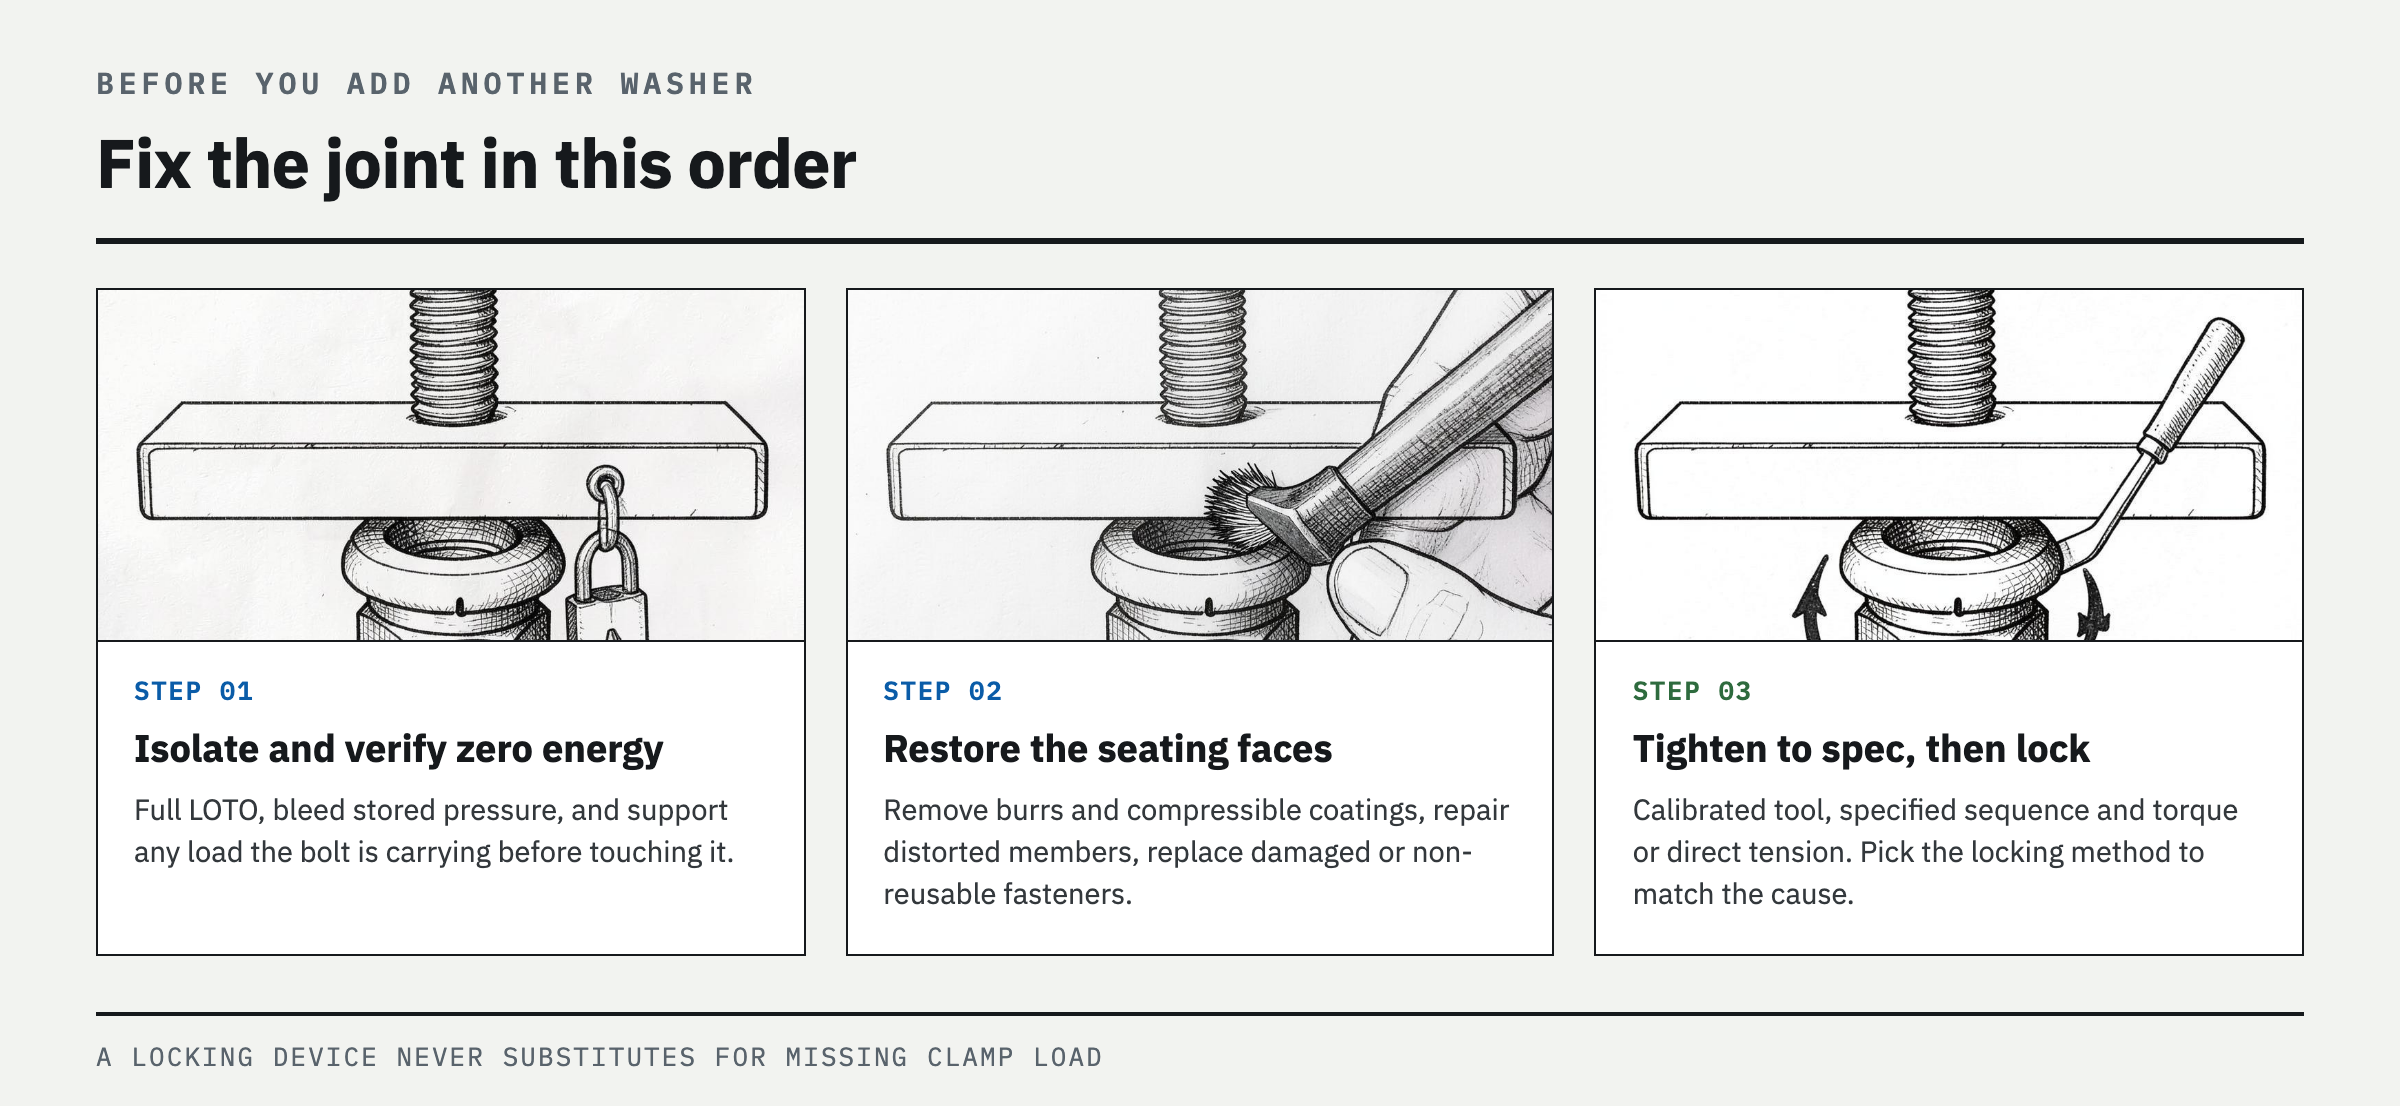
First repair deformed brackets, elongated holes, burrs, cracks, leaks, misalignment, and vibration sources. Restore bearing surfaces to the flatness and material specified by the design, and do not leave compressible paint or an unauthorized gasket in the clamped interface. Replace damaged bolts, nuts, and washers, as well as any components the manufacturer prohibits from reusing, and match the drawing requirements for size, grade, length, and thread engagement. Match the dry or lubricated condition of the threads and bearing surfaces to the manufacturer procedure, then use a calibrated tool and the specified tightening sequence, torque, or direct-tension method. Match the locking device to the cause. For transverse joint slip, use a wedge-lock or mechanical locking system validated at the design load and temperature. For general threaded joints exposed to vibration but requiring disassembly, use a suitable removable-grade threadlocker. Where loosening could cause a serious incident, apply positive rotation restraint such as a tab washer, castellated nut with cotter pin, or safety wire after design approval. No locking device can compensate for inadequate preload or a weak joint.
Prevent recurrence — control the baseline of the fastening system, not just one torque value
For each asset, record the complete bolt and nut size, grade, coating, grip length, washer and locking method, lubrication condition, tightening sequence, tool ID, target torque or preload, technician, and date in the fastening-control record. After maintenance, use witness marks only as an inspection aid, never as a locking device. Do not hide repeated loosening at the same location in a routine retightening schedule; escalate vibration, alignment, load path, and joint stiffness for design review. Retighten only at the conditions and interval specified by the manufacturer when initial settlement from thermal cycling, gasket compression, or new joint surfaces is expected. Arbitrary periodic retightening can progressively over-stretch bolts and damage threads.
FAQ
Why does my bolt keep loosening even with a lock washer?
A split lock washer cannot correct inadequate preload, joint settlement, or transverse slip. Use a witness mark to verify actual rotation. After LOTO, inspect the bolt size, thread engagement, bearing surfaces, lubrication condition, tightening procedure, and evidence of vibration. Eliminate the cause, then select a locking method validated for the application.
Will two lock washers stop a bolt from coming loose?
Stacking two lock washers only adds contact interfaces and more potential for settlement; it does not create a validated lock. Avoid stacked washers unless the drawing specifies them. Establish the required preload, then, after design approval, use a suitable wedge-lock or mechanical locking device for transverse vibration.
Should I use threadlocker or a lock washer for vibration?
Threadlocker is effective when applied to clean metal threads under the product-specific gap, temperature, and curing conditions. A wedge-lock washer is an alternative for joints exposed to transverse vibration that require maintenance disassembly, but the bearing-surface conditions must be verified. Neither compensates for a weak joint or incorrect preload.
Can I just tighten a loose bolt more?
Tightening without a specified preload or torque can yield the bolt, strip the threads, or deform the member. First determine whether the problem is rotation or settlement, then correct the fastener specification, friction conditions, tooling, and tightening sequence before tightening to the OEM or design value.
References
- NASA Reference Publication 1228, Fastener Design Manual
- VDI 2230 Part 1, Systematic calculation of highly stressed bolted joints
- DIN 25201-4, Design guide for railway vehicles and their components — Bolted joints — Part 4, securing of bolted joints
- Henkel LOCTITE, Threadlocking User Guide
- DIN 65151, Aerospace series — Dynamic testing of the locking characteristics of fasteners under transverse loading conditions (vibration test)
- OSHA, 29 CFR 1910.147, The control of hazardous energy
Spotted an error or have a question about this guide? Email contact@fixtheplant.com — corrections are prioritized.